Water softeners are pretty simple – the way they work to soften water is by replacing calcium minerals with sodium ones.
Their installation process, on the other hand, can be tricky.
You need to follow a lot of steps to the smallest detail and figure out how to put all of the components together.
We made this article to break down the process to its simplest so that anyone who wants to try a DIY installation can have the best shot.
Cost
It’s notoriously difficult to get a price estimate for water softener installation.
The reason why is that the installation cost also affects the final cost of a unit. A lot of online sources put the installation cost at around $300 to $1,000, while others claim that the range actually goes from $500 to $6,000.
We can also confirm the large variability in installation prices after reviewing a variety of different water softener brands. The installation cost is the one factor that always affects the initial price dramatically.
Several factors impact the price of the installation, including the size of the unit, the number of components, the number of hours that it would take the workers to install the unit, and so on.
All things considered, we’d say that, in most cases, you can expect the installation price to go above $1,000. It won’t always be the case, but considering that not even the water softener company itself can give you an accurate estimation of the exact cost until they finish the job, it’s best to be prepared.
A 4-figure installation bill isn’t ideal, and learning how much the device will set you back only after the softener is in place is extremely problematic. So, naturally, many people prefer to install the softener on their own. If you want to install the water softener yourself, here’s what you’ll need.
Requirements
The installation requirements will be different depending on the water softener brand because certain models have components that other models don’t.
While we’ll do our best to cover all of the required materials that you might need for the installation and everything you need to prep for it beforehand to give you a good general overview, keep in mind that you should also consult your product manual before starting.
Additionally, installing the softener on your own carries its own risks as well. You could hurt yourself or damage your home if you’re not careful. Additionally, you also damage the softener itself and void the warranty.
Repairing any damage that you might have done is likely going to cost you significantly more than paying for professionals to hook everything up for you. Only attempt to install your unit independently if you’re confident in your ability to work with your hands.
Installation Kits
Brands like Springwell sell installation kits that provide you with all of the necessary tools and items for installing the water softener yourself.
However, even though most products from these brands come with all of the necessary equipment already included in the package, keep in mind that some models might not include basic things like screws, so it’s always a good idea to have a few essential tools close by if you need them.
Tools
Here’s a list of the essential items that you’ll need for the installation:
- An adjustable wrench or a wrench set
- A drill
- Drywall screws
- Plumber’s tape
- Hose clamps
- (2) shut-off valves
- (2) corrugated water connectors
- A 20-foot-long hose
Most water softeners and installation kits come with a shut-off valve, corrugated water connectors, and a length of hose, but you’ll need to supply the rest of the materials yourself.
This is also a rundown of every tool that we’ll mention throughout the article, so not all of these items are necessary for every installation process.
To make things as easy as possible, we’ve outlined the required tools for all the different water softener types so you know exactly what you’ll need for your specific unit.
How to Install a Water Softener
Before we dive right in, let’s say a word or two about the right placement of the water softener unit in your household.
Where to Install a Water Softener?
The best place to install a water softener unit is going to depend on the size of the device.
Under-sink units are self-explanatory. They’re designed to go under the sink, so they’re quite compact.
Portable units are also relatively small and very easy to place. But they don’t have a large grain capacity, and they usually have a flow rate that’s mediocre at best. Because they’re limited in how much water they can soften, these small units should be placed close to the sink in your kitchen.
Whole-house water softeners are generally 4-5 feet high and come with a brine tank that’s usually 2 feet wide and 3 feet tall. These devices require a lot of space, so the best option is to put them in the basement.
Placing the water softener in the basement has several advantages. First, it gives you much more space to work with while installing the unit. Second, and more importantly, it allows the unit to be close to the main water lines in your home. This placement will allow you to easily get soft water throughout your entire home.
If you don’t have a lot of space in your basement or there’s a lot of clutter, we’d suggest clearing things out to get access to your main water pipes.
Installing Under-sink Water Softeners
Essentially, there are two different types of under-sink water softeners in terms of installation. You might be dealing with a self-standing model or a hanging model that needs to be attached to the wall or the back of the cabinet.
Self-Standing Model
What you’ll need: Wrench
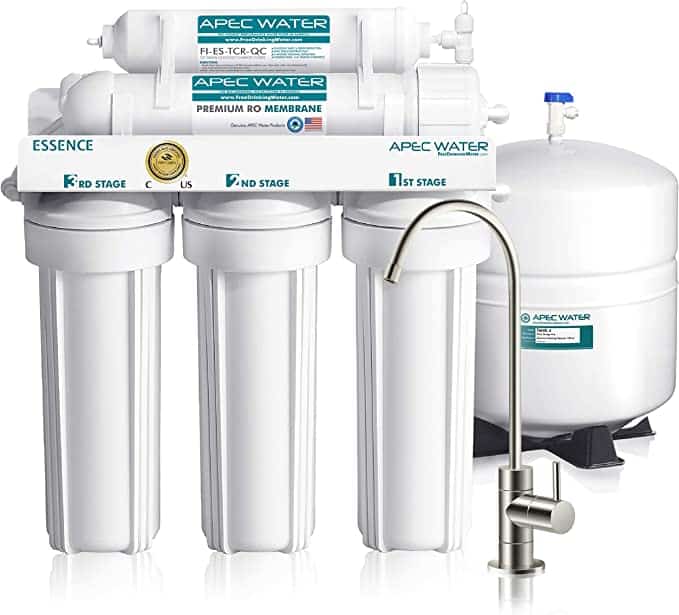
All you need to install self-standing models like the APEC is enough space in the cabinet under your sink. Once you place the softener inside the cabinet, you’ll need to turn off the water going to your sink before you do anything else. Then you’re going to grab your wrench and detach the water hose that leads to the faucet.
Attach the water hose to the input valve on the water softener, then take the output connection from the device and attach it to the faucet. The softener is ready to go once you turn the water back on again.
Hanging Models
What you’ll need: Wrench, drill, and drywall screws
Hanging water softeners like the Express Water model need to be attached to the back of the cabin with screws.
Turn off the water, detach the water connector from the faucet, and measure where the water softener is supposed to go. You don’t want the water connector to get stretched, so make sure to place the softener relatively close to the faucet.
Hanging models come with metal frames with screw holes in them, so all you need to do is place the device flat on the wall and drill the screws in the designated spots. We’d suggest propping the softener on something like a book. This way, you can hold it in place easier without having to strain one hand holding the device while you try to drill with a single hand.
To make things easier, we suggest asking a friend or family member to help you with the installation. Have them hold the softener under the sink while you attach the water connection to the input valve and the output connector to the faucet. Then, they can hold the device flat to the back wall, and you can drill the holes without even having to measure or mark anything.
Once all of this is over, you’re ready to turn the water on and start softening your water.
Portable Water Softeners
What you’ll need: Wrench
Portable water softeners usually have the same simplistic design as under-sink models. They can be a bit larger, but you still get a pretty compact device that fits in the cabinet under the sink.
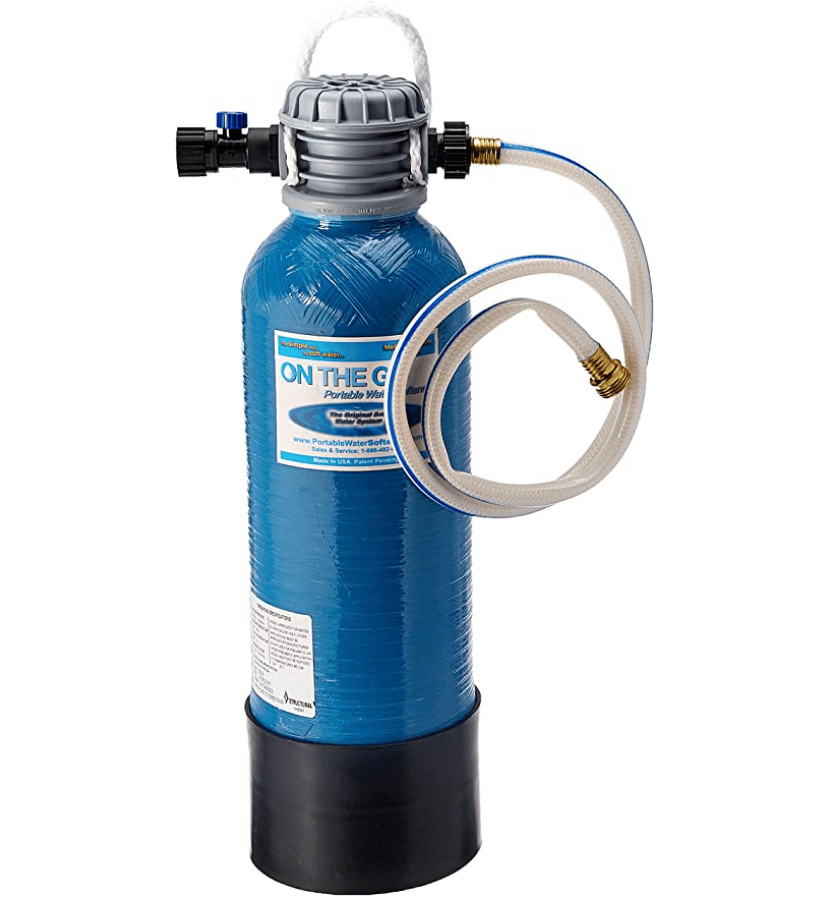
Units like the OTG3NTP3M have a height of 7 inches, so all you have to do is fit them under the sink, attach the water hose to the input valve, and attach the output hose to the faucet.
Whole-House Water Softeners

Whole-house systems come in many different shapes and sizes, so there are several different ways to install them.
Before You Start
Larger units will need to be placed in the basement or in the area of the house where the main water stop valve is located. And before you get started with the installation, you’ll need to do a bit of prep work on the pipes themselves.
Finding a section of pipe
You will need to remove a section of your water pipe to make space for the water softener. Most pipes are divided into several segments, so it’s best to find a segment that’s at least 3-4 feet long to make sure you have a decent amount of space where you can install all of the components.
Find a segment of pipe that goes horizontally, then section off around 3-4 feet of that pipe. Next, go ahead and turn off the water in your home and remove the section of pipe that you’ve selected.
When you’re done, you should have an input pipe end and an output pipe end with around 3-4 feet of empty space in between them.
Keep in mind that you need to know which way the water in your house flows to determine which is the input pipe end and which is the output. Water needs to enter the water softener from the input pipe and leave the unit through the output pipe.
The basic rule of thumb is that any pipe that goes from the basement and up towards the rest of the house is the output end, while the input pipe end will be coming from the ground or from outside.
Walled-in pipes
The pipes in your basement usually aren’t walled-in so that plumbers can easily access the main water source in case there’s a need for repairs.
It’s very rare that the main pipes in the basement are behind a wall, but if you have that situation on your hands, you’ll need to make a hole in the wall to find the pipes.
We advise against doing this on your own since, at that point, the installation turns into a full-blown home renovation project.
Anyone with walled-in pipes should call in a professional plumber or at least a builder that can locate and take out an output and input valve from the pipes in the walls.
No pipe sections
Another issue you can run into is the lack of pipe sections. Your pipes might not be divided into sections but rather be composed of several long uniform pieces. Luckily, this is an easy fix.
If you have a pipe that’s 6-7 feet long without any sections, then remove it and replace it with two pipe segments that are around 3 feet long.
You need these pipe ends because you’re going to screw on shut-off valves to them. The alternative option is to cut off a section of the long pipes and weld on a shut-off valve, which requires specialized skills and tools, so you’ll need to hire someone to do the job for you. Dividing the larger pipe into several smaller sections is the more efficient and smarter move.
Shut-off Valves
What you’ll need: Plumber’s tape
Once you have your input and output pipe ends, you can take your two shut-off valves and attach them to both ends.
Take some plumber’s tape and put it at the end of the valves. The tape is meant to keep the valve in place more firmly and reduce the possibility of water leaking from the pipes or the valves, so put at least a double layer on it.
Once the tape is in place, turn the valves to fix them in place. It doesn’t really matter if the release switch on the valves ends up on the top or the bottom of the valve, but we’d suggest not having it towards the wall since it might make it a bit more difficult to access it when you need to turn off the water.
Once you’ve affixed the two valves to the pipes, put a few layers of plumbers tape at the other ends as well.
Pre-Filter
Pre-filters are essentially there to collect sediment and larger particles and prevent them from getting into the tank. To do this job successfully, you need to place them in between the water tank and the input pipe.
Prepping the pre-filter
Pre-filters don’t come ready-to-go, so you’ll need to prepare them before you attach them to anything. Here’s how to do the preparation.
- Take the lid off of the cylindrical housing
- Take the rubber O-ring and cover one side with a thin layer of lube
- Place the O-ring on the grove on the rim of the housing
- Cover the other side of the O-ring with a thin layer of lube
- Place the sediment filter on the inside of the pre-filter housing
- Place the lid back onto the housing and tighten it
Once you’ve completed all the steps, the pre-filter is ready to go.
Attaching the pre-filter
What you’ll need: Two 1-inch PVC nipples, plumber’s tape, 2 corrugated water connectors, a drill, and screws
Before you set up your pre-filter, you should place your resin tank next to the pipes to get a measurement for the height of the tank. You need to have a general idea of where the top of the tank goes so that you know roughly where to put the pre-filter that feeds directly into it. Once you’ve done that, follow these steps:
- Insert the first corrugated water connector into the input shut-off valve
- Bend it into a semi-circle that goes below the valve to get an estimation of where the pre-filter will need to be placed
- Mark the location of the pre-filter input valve on the wall with a pencil
- Install the mounting brace for the pre-filter
- Put some plumber’s tape on both ends of the two 1-inch PVC nipples
- Screw the first nipple into the input valve on the pre-filter
- Screw the second nipple into the output valve on the pre-filter
- Place the pre-filter on the mounting brace
- Attach the corrugated water connector to the input valve on the pre-filter
- Take the second corrugated water connector and screw it onto the output valve on the pre-filter
Before we conclude this paragraph, we should mention one more thing. If the water softener doesn’t come with a pre-filter, you can skip all of this. Without a pre-filter, you should attach one end of the corrugated water connector to the shut-off valve and the other end to the resin tank input valve.
Resin Tank
Once the pre-filter is in place, place the resin tank close enough to the pre-filter to connect the two through the corrugated water connector that’s already on the pre-filter.
The main reason why we placed the pre-filter below the input pipe is to give you a lot more flexibility with the resin tank location. However, you should still ensure the water connector isn’t too bent.
Preparing the resin tank
What you’ll need: Plumber’s tape
Most resin tanks come fully assembled and ready to go, but a few of them must be put together first. Here’s what you need to do if this is the case with your unit.
The whole procedure is straightforward, and most units are divided into two components – the resin tank itself and the electronic head.
Place the resin tank on a flat surface and ensure it’s centered – not leaning in any direction. These tanks are heavy, and if they’re imbalanced, they’ll topple. When that happens, they’ll take most of the components and maybe even some of the pipes with them to the ground.
Once the tank is in place, get the electronic head. The part that we’re referring to as the “electronic head” is essentially the LED display and the input valves.
Take off the cap or the lid that’s on top of the tank, push the so-called “neck” of the head into the opening you just made, and turn the head until it’s fastened in place.
If your electronic head comes with connections, then place them in the input and output valves at the back. Take a bit of the plumber’s tape and coat the ends of the valves with it.
Installing the resin tank
What you’ll need: Corrugated water connector
Here’s how to install the resin tank:
- Place the tank close to the pre-filter
- Ensure that the water connector that leads from the pre-filter is connected to the input valve on the resin tank
- Take your corrugated water connector and attach one end to the output valve on the resin tank
- Take the second end of the corrugated water connector and attach it to the output stop valve that’s on the wall
The installation of the tank is pretty straightforward and simple after this point. However, we would recommend keeping a few 1-inch nipples at hand in case the ends of the water connectors and the resin tank connectors can’t be attached by themselves.
Brine Tank
Brine tanks are usually shorter and wider than resin tanks. The size of the tank is generally 2×2 or 3×3 feet, but the dimensions vary from unit to unit. Regardless of the exact height and width, these tanks don’t take up too much space. Still, they’ll need to be placed relatively close to the resin tank so that the regeneration process can run efficiently.
Prepping the brine tank
Each brine tank model is different, so not everything we say might apply to your specific brine tank. However, most brine tanks include the components that we mention in this section, so most of what we say should apply to the majority of brine tanks on the market.
Brine tanks consist of a brine well, a floater, and a salt filter. The brine well is a large cylindrical piece of plastic that’s usually placed inside of a square or a circular base that you can put on the inside the brine tank.
The floater goes inside the well and regulates the brine flow, whereas the salt filter is placed at the bottom of the well to prevent too much salt from getting into the well and clogging it. To put the floater into the well, you need to take off the cap, so don’t forget to put it back on before closing the resin tank, or brine will get into the well.
Once you place all of these components inside the tank, you should add the salt.
Connecting the brine tank
What you’ll need: A length of hose and hose clamps
Once the brine tank is placed next to the resin tank and prepped, cut off a few feet of hose and get a few hose clamps.
There should be two drain lines at the base of your electronic head. Look through your instructions manual and find out which one is for the brine tank and which one is for the drain line.
Once you’ve located the brine tank drain line, place the hose over the connector, and use a hose clamp to secure it so it doesn’t move or get detached. Make sure that the clamp covers both the connection point and the hose. Otherwise, the hose will not be secured.
Locate the connection point on your brine tank and do the same. The brine tank is ready to go once both ends of the hose are secured to the tank connections.
Drain Line
What you’ll need: A length of hose and hose clamps
The remaining empty connection point at the base of the electronic head is meant for the drain line. Cut off a few feet of rubber hose, get a hose clamp, and secure the hose onto the connection point.
The other end of the hose will need to be directed either toward a drain on the floor or toward a bucket where the wastewater can be collected. Both options work, but we recommend going for the drain line option if you can since it’s a lot more practical than emptying the wastewater bucket regularly.
Standard and Salt-free Water Softeners
There are more than a few differences between standard water softeners and salt-free models, but the only important difference we care about today is the installation process.
Salt-free water softeners use something called TAC resin rather than the ion exchange resin in standard water softeners. The TAC resin doesn’t need to be recharged with sodium, so salt-free water softeners don’t need a brine tank.
The lack of a regeneration process also means that there’s no need for a drain line since no water is wasted when these units soften hard minerals.
To conclude, if you’re installing a salt-free unit, the same installation process applies, but you should skip the sections on the brine tank and the drain line.
Programming the Water Softener
Once all the components are put together, all that’s left to do is to plug the unit in and set it up.
Some units might come with features like an alarm that notifies you when the sodium levels are low or even an app that allows you to check the device’s information through your phone, but you shouldn’t bother with these for now.
The only setting that you need to change is the regeneration cycle. We’d recommend setting it to start at some time during the night while you’re sleeping.
Setting the regeneration cycle to run while you’re sleeping will ensure that you won’t use the softener while the brine tank is doing its thing. Nevertheless, you can set the clock to any time you prefer.
There are also metered regeneration units that run the regen process automatically once a certain amount of water has been softened. Most models have a set limit to how much water can be softened before the regeneration starts, but some allow you to slightly adjust the limit.
After the regeneration timer is set, turn the water back on and try to use the softener. We recommend having someone run the faucet upstairs while you stay downstairs and check to see that there aren’t any leaks and that everything’s working as it should be.
We also recommend using a water test to check the water before and after you turn on the softener to get a better sense of whether or not the hard minerals are actually being removed.
Conclusion
As we’ve already mentioned, getting a professional to install the water softener for you will probably cost you a few thousand dollars, so some people prefer to try installing before calling for help.
As long as you don’t rush and don’t get frustrated, there shouldn’t be anything in the installation process that can’t be handled by someone good with their hands.
On the other hand, if you aren’t confident that you can take on a project of this size, you should leave things to the professionals.
As you can tell by the size of this article, there’s quite a lot to do. If you’re someone that doesn’t know which side of the screwdriver is the handle, then you might damage the water softener, the components, your pipes, and even your wall.
What we’re trying to say is that it’s better to pay for installation than repair costs.
What type of resin is used in the two resin tanks before the brine tank
Thank you
Hi Milton, do you have a specific brand and model you’re asking about or just in general?